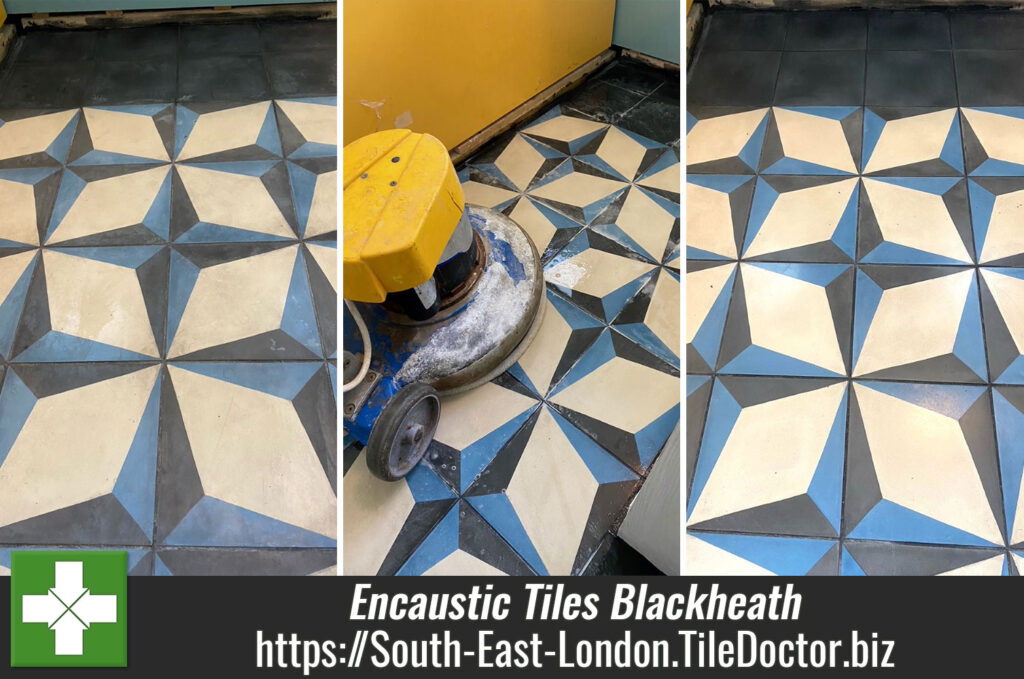
Grout-Stained Encaustic Floor Tiles Renovated in a Blackheath Bathroom
My customer recently had a new bathroom installed in their apartment in Blackheath London, SE3, including all new wall and floor tiles. The tiles they chose for the floor were encaustic cement and laid in a geometric pattern. Unfortunately this type of tile is very porous and because they had not been fully sealed before grouting the Black grout stained the tiles. This made them look dirty and despite great efforts to clean them by the owner nothing appeared to work.
 |
 |
This is a far too common problem; many installers mistake the tiles for ceramic which are glazed and very easy to install. To rectify it requires the tiles to be burnished with different grades of diamond pad, and then sealed to protect them going forward.
I informed the customer what the process would be and worked out a quote for the renovation. Happy that the problem would be resolved the job was booked in.
Cleaning an Encaustic Tiled Bathroom Floor
Work started with the application of a coarse 200-grit diamond pad fitted to a rotary machine. Water is used to lubricate the process and the pad is worked across the floor making sure that it contacts every part of each tile. Once I had covered the whole floor in this manner the now dirty water was extracted with a wet vacuum.
 |
 |
This process was then repeated with a full set of diamond burnishing pads with grits from 400 to 3000. These pads gradually refine the tile and slowly build-up a polish on its surface.
The last 3000 grit-pad is applied dry with only a small amount of water sprayed on to the tile thereby leaving the floor dry.
Sealing an Encaustic Tiled Bathroom Floor
The floor was then sealed later that day using four coats of Tile Doctor Ultra-Seal to ensure it was fully sealed. Ultra-Seal is a natural look sealer that works by soaking into the tiles occupying the pores and thereby preventing dirt from becoming ingrained there. This ensure dirt and liquids remain on the surface where they can be easily removed.
The burnishing removed the staining and added a lovely subtle sheen to the tile. My customer was very pleased with the result and relieved that the problem had been resolved.
 |
 |
As long as the sealer remains in place it will ensure they remain easy to clean however you need to be careful what product you clean them with as strong bleach based cleaners will damage the sealer. For this floor I would recommend Tile Doctor Stone Soap which is a gentle yet effective Tile Cleaner that helps maintain the patina on polished tiles.
Professional Restoration of an Encaustic Tiled Bathroom Floor in North Essex
Grout-Stained Encaustic Floor Tiles Renovated in a Blackheath Bathroom Read More »