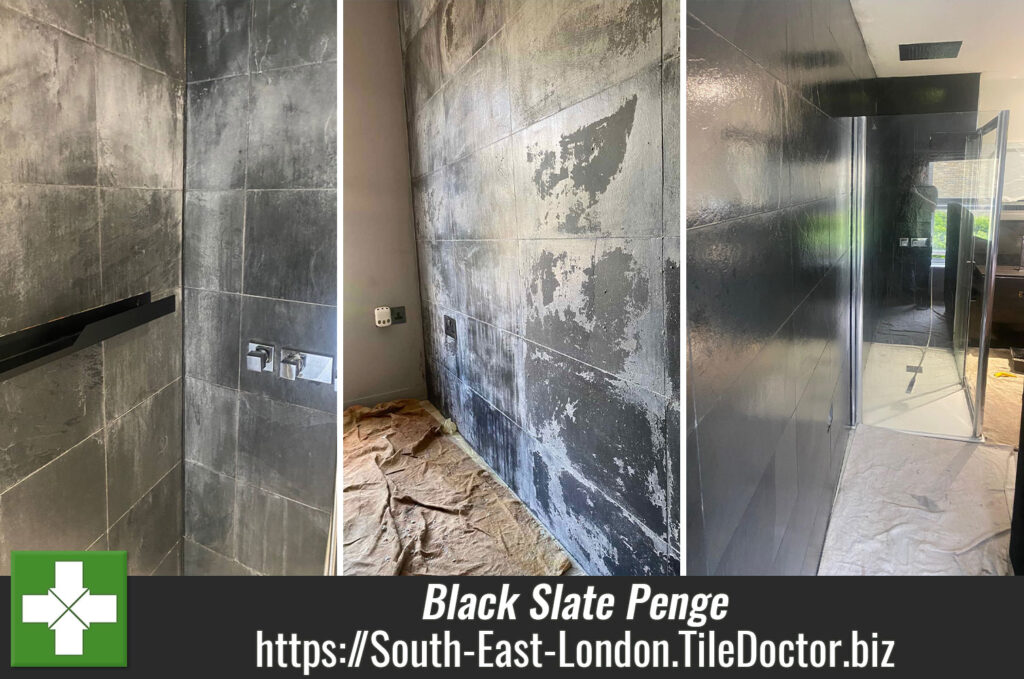
Damaged Sealer Replaced on Black Slate Wall Tiles in a Penge Bathroom
The photographs below are of a Slate Tiled Bathroom at a property in Penge. The customer had an open plan ensuite bathroom and feature wall in Black Slate, unfortunately however the topical sealer had become damaged and now looked terrible. The owner was clearly unhappy with its appearance and called us in to take a look.

I went over to the property to survey the tiles and work out what had happened. In this case I diagnosed that moisture had penetrated beneath the sealer causing it to become white and cloudy. Clearly the sealer used previously was not the best choice for a bathroom where a high level of moisture in the air is common.

The solution would be to remove the old sealer entirely, clean the tile and grout and then apply a suitable impregnating sealer which wouldn’t have the same issue. I worked out a quote along these lines which was accepted and a date set for my return to carry out the work.

Removing Sealer from Black Slate Wall Tiles
I set about removing the old sealer by applying a strong dilution of Tile Doctor Remove and Go which as its name suggests is a coatings remover. Working in one section at a time the solution was decanted into a spray bottle and sprayed onto the wall tile, this mixes the solution with air making it lighter and helps it stick to vertical surfaces better.
After a few minutes the solution was worked into the stone by hand with a scouring pad, the delay gives the product time to start breaking down the old sealer. After scrubbing a section, it was rinsed with water and checked to see if more work was needed. Due to the thickness of the sealer I had to repeat this process several times aided by a steam cleaner before I was happy all the sealer had been removed.

When I was happy that all the damaged sealer had been removed from the Slate tiles, I continued to remove all the sealer from the remaining area. This is important as I would be applying an impregnating sealer later and any remaining sealer would prevent it from soaking into the tile. Also, the last thing you want is different depths of sealer on the stone as it will result in an inconsistent appearance.
Sealing Slate Wet Room Tiles
When all the sealer had been removed and the Slate was dry, I was then able to re-apply the new sealer. Its important that the stone was dry before applying the new sealer as any dampness in the stone can effect the way the sealer cures.
I chose two products to seal the Black Slate starting with a single coat of Tile Doctor Colour Grow which was selected for several reasons. First, its fully breathable so can cope with moisture, also as its name suggests it contains a colour enhancing formula which helps to bring out the best in dark stone. This product is also an impregnator which basically means it will soak into the stone, occupying the pores and thereby ensuring that any contaminants remain on the surface where they can be easily wiped away.
Once all the Black Slate was covered, I allowed a quick dwell time before rubbing off the excess sealer. After the first coat of Colour Grow had dried I the applied a second coat of Tile Doctor Stone Oil, this really enhances the colour of the stone. The same application and drying process were used, before I carried out a third and final coast of sealer using Colour Grow again.

The combination of sealers brought out the best in the Black Slate which developed a lovely deep shine. The result was completely transformative and as you can imagine the owner was very happy with the improvement.
For aftercare I recommended they clean the shower tiles with Tile Doctor Aqua Pro, this is a gentle but effective spray on shower tile cleaner that has been created for cleaning sealed stone. The formula won’t harm the sealer ensuring it lasts longer.

Professional Slate Tile Restoration in a Kent Wet Room
Damaged Sealer Replaced on Black Slate Wall Tiles in a Penge Bathroom Read More »