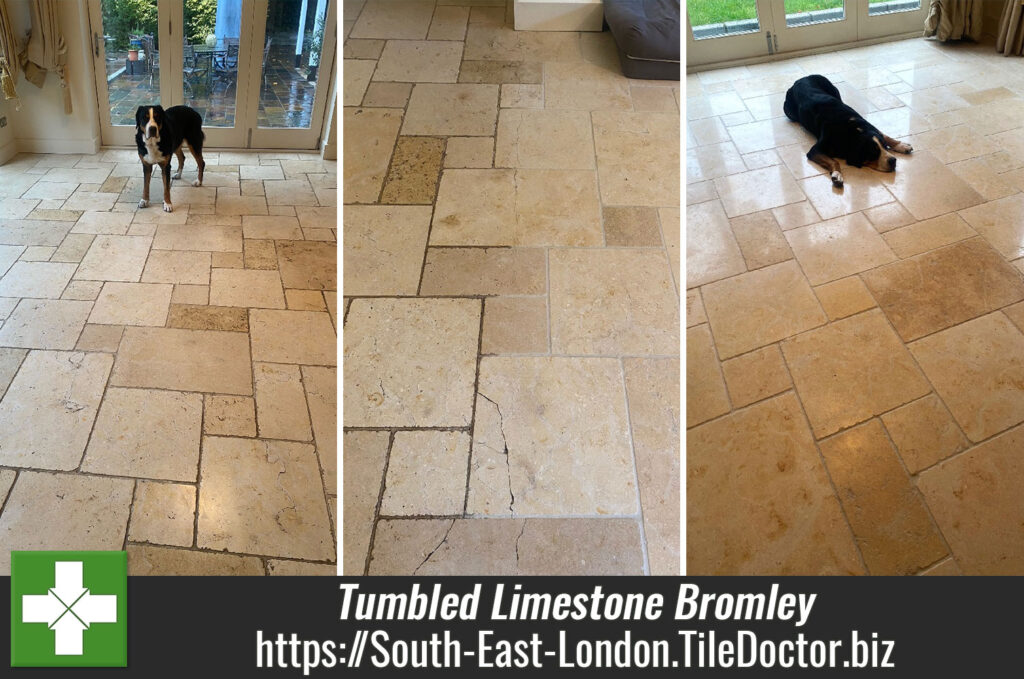
Tumbled Limestone Floor Cleaned, Polished and Sealed in Bromley
I get called to renovate this Tumbled Limestone tiled floor at a property in Bromley every few years. The sealer does a good job of protecting the stone, but it does wear off with use and the natural crevices in the Travertine attract dirt easily. The other problem of course is the grout which due to its cementous nature also attracts dirt and darkens over time.

Polished stone floors do regular attention if you want to keep them looking good and this is why we offer a maintenance program where we pop back to the property once a year to top up the sealer and repolish. In this case the owner also had a dog who was very well natured however dogs are not know for wiping their feet before entering your house.

Stripping and Polishing Tumbled Limestone Tiles
With most polished Limestone floors, I would normally start with a set of burnishing pads which are the best way to restore the finish. In this case however I decided to start the cleaning process with the application of a strong dilution of Tile Doctor Pro-Clean which is left to soak into the stone for ten minutes before being worked in. This gives the product time to digest and breakdown the dirt that gets trapped in the crevices. I then use a silicon carbide brush fitted to a rotary floor machine to work the solution into the stone to bring out the dirt. The soiling is then rinsed off the floor and extracted with a wet vacuum.
The next step was to burnish the stone using a set of Diamond encrusted pads of increasing grits that range from a coarse 400-grit to a very fine 3000-grit. The pads are fitted to the rotary machine and are run across the whole floor lubricating with water which is deployed from a tank on the machine. After each the pad the soiling is rinsed away and extracted with the wet vacuum as before.

I stopped the burnishing process on the first day with the 1500-grit pad and turned my attention to the grout joints which are scrubbed by hand with a wire brush and more Pro-Clean. After another rinse and extract the Limestone and grout was already looking noticeably cleaner.
Sealing Limestone Tiles
I returned the next day and set about polishing the floor with the last in the set of burnishing pads which is a 3000-grit pad. This pad is applied with only a little water sprayed on to the stone as its run over the surface, this technique is known as a spray burnish and leaves the floor dry and ready to be sealed.
I was already aware that the owners of the property like the stone to look completely natural and so the sealer chosen was Tile Doctor Ultra-Seal. This is an impregnating sealer that works by soaking into the pores of the stone so dirt cannot become ingrained there allowing it to be easily removed from the surface. It doesn’t change the appearance of the stone at all so it’s almost invisible and difficult to detect which is exactly what they were after. Ultra-Seal is also a great grout sealer and will ensure the grout keeps clean for much longer.

Once the sealer was dry gave the floor an application of Tile Doctor Shine Powder which is a stone polishing compound that is worked into stone, left to dry and then buffed off with a White buffing pad to leave a durable shine on the stone.

Before leaving I took time to discuss aftercare cleaning and left them with a complimentary bottle of Tile Doctor Stone Soap which not only cleans but also help maintain the patina on polished stone.
Professional Renovation of a Large Polished Limestone Floor in Kent
Tumbled Limestone Floor Cleaned, Polished and Sealed in Bromley Read More »