Victorian Tile Cleaning

Welcome to my Work History archive where you will find detailed examples of the cleaning and renovation of Victorian tiles carried out in South East London

Cleaning and Renovating Victorian Tiles

Commonly found in the hallways of oldder UK properties Victorian tiles are very hard wearing and can provide a classic look to any space. We often find that the beauty of these tiles are hidden under years of grime and neglect and are often covered up with carpets etc as tastes have changed over the years. If this sounds familiar then all is not lost as they can be restored.

The standard bearer for quality Victorian tiles was a firm called Minton Hollins, an English manufacturer who made a very good product which lasted the test of time. Victorian building practices however did not include the use of damp proof membranes and we often find damp can be a major issue with these old floors leading to salt problems known as efflorescence.

Common problems we face when restoring Victorian tiles are the removal of carpet glue, paint splashes and cement. Loose and cracked tiles can also be a problem however due to their popularity we usually find finding replacement tiles isn’t a problem.

Below you will find detailed examples of work we have carried out in the past, it should give you some idea of what’s involved and what can be achieved with the right techniques and products.


Victorian Tiled Path Restoration Lewisham SE13

Neglected Victorian Tiled Pathway Fully Restored in Lewisham SE13

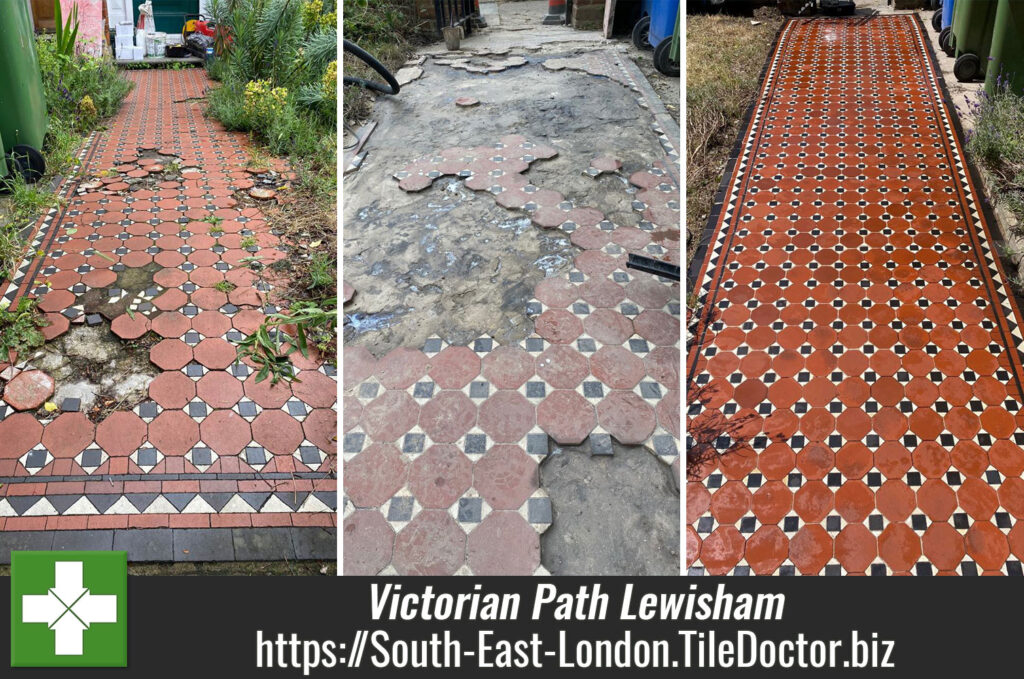
Last year I published a job I completed, the restoration and repair of a dilapidated tiled path that led up to a Victorian house in Lewisham . Impressed with the transformation another homeowner from Lewisham SE13 got in touch with me about their own path that was very similar and dated to the late Victorian period.

Victorian Tiled Path Before Restoration Lewisham SE13

As before I went over to survey the path and confirm how much work would be involved. This path was also badly neglected with many tiles missing or badly damaged. I worked out a quote for the owner which was accepted and I set about sourcing matching replacements.

Victorian Tiled Path Before Restoration Lewisham SE13

Cleaning and Repairing a Victorian Tiled Pathway

The first job was to remove all the debris including the old broken and loose tiles, some of which were salvageable and so put aside for re-use. More tiles were dislodged during this work than I expected however it’s not a problem it just causes more work. The next step involved cleaning up and re-building the foundation where needed with cement, and ensuring the exposed base was level.

The replacement tiles were then cut to shape to match the pattern and had to be ground down to make them thinner and match the depth of the originals also leaving space for the adhesive. The tiles were then dry fitted into place to ensure I had matched the original pattern exactly. After a lot of adjustments and fiddling I was happy and started securing the tiles in place with adhesive.

After the tiling work was completed, it was time to move onto the cleaning. With an internal hallway I normally start with Tile Doctor Remove & Go which is a great product for breaking up old sealer and ingrained dirt. However, I knew there wouldn’t be any sealer on the external tiles and my biggest problem was the mould and algae that was living on and in the tiles. I therefore had decided to treat the path as though it was a patio and applied Patio & Brick driveway cleaner, keeping the tiles wet with the solution for thirty minutes before scrubbing it in. Once done the soiled solution was vacuumed away and I moved onto the next step.

I went over the tiles with a 50-grit coarse resurfacing pad, attached to a rotary floor scrubbing machine. I kept the pads lubricated with an application of Tile Doctor Acid Gel to get the path very clean. This is worked into the tiles via the diamond pad to further deep clean the tile and remove grout smears etc.

The soiling was then rinsed off and extracted with a wet vacuum.

Sealing a Victorian Tiled Pathway

When dry I applied three coats of Tile Doctor Colour Grow, an impregnating sealer which brings out the natural colour of the tiles. This product is a hard-wearing impregnator that soaks into the pores of the tile preventing dirt from residing there and thereby keeping it on the surface where it is easily rinsed away.

Victorian Tiled Path After Restoration Lewisham SE13

I think you will agree the Victorian path looked great once fully restored and looked like a new installation much to the delight of the owner.

Victorian Tiled Path After Restoration Lewisham SE13


Professional Restoration of a Victorian Tiled Pathway in Southeast London

Neglected Victorian Tiled Pathway Fully Restored in Lewisham SE13 Read More »

Victorian Tiled Path Restoration Lewisham

Dilapidated Red and Black Victorian Tiled Path Restored in Lewisham

This customer contacted Tile Doctor about the dilapidated Victorian tiled path that led up to their property in in Lewisham. It was in quite a state as your can see from the photographs on this page, tree roots had lifted the tiles in certain areas and there were a lot of loose tiles. Intrigued I offered to come and take a look and see what could be done.

After visiting the property, I could see that as well as tiling, some repairs to the foundation due to the tree roots would be needed but generally the path was in solid condition. Also, there was still a good fall to the path so rainwater would drain away easily.

Victorian Tiled Path Before Restoration Lewisham

Before becoming a Tile Doctor my trade was tiling so I wasn’t put off by the significant amount of tiling that this project needed. I worked out a quote for the work needed which they were happy to accept and we set a tentative date for my return and hoped for good weather.

Repairing a Victorian Tiled Pathway

The weather was fine so I was able to start work by carefully lifting all the broken and loose tiles and putting them to one side for re-use where possible. This then exposed the path foundation, which needed digging out in in places and backfilling with cement. I also used a grinder to remove any high spots and leave the foundation base as flat as possible.

Victorian Tiled Path During Restoration Lewisham

Next came the tiling which had to match the existing geometrical pattern. I used a combination of the salvaged tiles from earlier which had to be cleaned up and new reproduction tiles that I had managed to source from a specialist supplier. The tiles were laid out dry initially to ensure the pattern was correct and only then were they fixed in place with new adhesive and then grouted. All these repairs may sound straightforward but the work actually took three days to complete.

Deep Cleaning a Victorian Tiled Pathway

The path was then left to set overnight and I returned later to give them a deep clean. To do this I started with a strong combination of Tile Doctor Remove & Go and Nanotech HBU stain remover. This was sprayed onto the path and left to soak in for a good ten to fifteen minutes to give it time to break down the grime and dirt that had built up over the years. The solution was then scrubbed in using a coarse 50-grit diamond pad fitted to a rotary machine.

The dirt released from the tiles was rinsed off and extracted with a wet vacuum and the process repeated, this time with Tile Doctor Acid Gel and a 100-grit then 200-grit diamond pad. This process deep cleans and hones the tile removing ingrained dirt and improving their appearance. The path was rinsed and soiling extracted afterwards, then left to dry off overnight.

Sealing a Victorian Tiled Pathway

The weather held out and I returned the next day to seal the tiles using three coats of Tile Doctor Colour Grow which is a breathable colour enhancing impregnating sealer. Impregnators work by soaking into the pores of the tile, occupying the pores and thereby preventing dirt from becoming ingrained there.

Victorian Tiled Path After Restoration Lewisham

The customer was very pleased with the results and the path has been saved for another 100 years. The new sealer would ensure dirt remains on the surface where it can be easily cleaned away for which I recommended using Tile Doctor Neutral Tile Cleaner.


Professional Restoration of a Victorian Tiled Pathway in Southeast London

Dilapidated Red and Black Victorian Tiled Path Restored in Lewisham Read More »

Victorian Hallway Floor Restoration Hither Green

Carpet Covered Victorian Tiled Hallway Restored in Hither Green

I was asked to view a Victorian tiled communal hallway floor at a property in Hither Green that serviced two Victorian maisonettes. The original Victorian tiles had been covered in carpet and an underlay for many years and now that had worn through the residents decided to investigate having the original tiles restored.

I went over to the property to inspect the floor and create a plan for its restoration. We pulled the carpet back and discovered that a section of tiles were missing and the gap had been backfilled with a sand cement mix. I didn’t know at this point whether the base was solid or if the tiles around the repair would also need to be lifted and replaced.

The Victorian tiles had also been imprinted with the pattern from the carpet underlay and the carpet had been secured to the floor with gripper and adhesive all of which would need to be removed as part of the restoration.

Victorian Hallway Floor Before Restoration Hither Green

Undaunted with the task at hand I created a quote for this restoration which included replacing the missing tiles with matching replacements then deep cleaning and sealing the tiles to protect them going forward.

Happy with the quote I was given the go-ahead to start the work and pre-order the replacement tiles.

Repairing a Carpet Covered Victorian Tiled Hallway

When I started the work, I found that the base was generally in good condition and solid so not many additional tiles would need to be replaced. I then set about replacing the main body of the tiling and the border where it was needed, using new reproduction geometric tiles. They were as close a match to the original however being newer they were a slightly different shade.

Once all the tiles had been replaced and repaired, I turned my attention to cleaning the floor to remove the staining and years of dirt. I started this with an application of Tile Doctor Remove & Go which is designed to remove sealers and other contaminants. The tiles did not have a visible sealer on them however it did have years of grease and oil that would need to be broken down.

A strong dilution of Remove and go was applied to the tiles and then allowed to dwell and soak in for around half an hour. It was then worked into the floor with a black scrubbing pad fitted to a rotary machine. The dirty solution was then extracted using a wet vacuum.

Next the floor was treated to an acid rinse with an application of Tile Doctor Acid Gel. The acid gel sits on top of the clay-based tiles and doesn’t soak in giving me a longer working time on the tile surface. This was then worked in with soft diamond burnishing pads of 50, 100 and 200-grit. These pads cut into the surface of the tile leaving it very clean but are not strong enough to scratch or change the tile surface. It does however remove the pattern on the tile left by the underlay. The acid will also counter any efflorescent salt issues that may be dormant in the tile which is a common problem with old floors that don’t have the advantage of a damp proof membrane.

Once the acid had been vacuumed up, I rinsed the tiles thoroughly with a steam cleaner, this lifts all the cleaning chemicals out of the tile and dries quickly.

Sealing a Victorian Tiled Hallway

When the floor was totally dry, I set about sealing the tiles which will protect them going forward and ensure that dirt remains on the surface where it easily cleaned away. I use Tile Doctor Colour Grow to seal original Victorian floor tiles, this is an impregnating sealer, that enhances the natural colour of the tiles and leaves the floor with a natural matt finish. Its also fully breathable so will allow moisture to rise through the tile and not become trapped underneath where it could reach out to the walls and cause rising damp.

I applied three coats of Colour Grow, but after the first coat, I noticed that there was a different shade of Red between the new reproduction tiles and the original tiles. As the original tiles were lighter, I applied a coat of Tile Dr “Stone Oil”, to the original tiles only, to help darken them, before applying the third and final coat of Colour Grow.

Victorian Hallway Floor During Restoration Hither Green

The restoration completely transformed the floor and the customers were very happy with the result. For aftercare I recommend they use Tile Doctor Neutral Tile Cleaner, which is safe to use on sealed tiles. Many of the products you find in supermarkets are simply too strong and can remove the sealer so its always best to read the label.


Professional Victorian Tiled Hallway Restoration and Extension in Hither Green

Carpet Covered Victorian Tiled Hallway Restored in Hither Green Read More »

Damaged Victorian Step Before and After Restoration Chislehurst

Damaged Victorian Tiled Step Fully Restored in Chislehurst

This client in Chislehurst wanted to create a better first impression as their front Victorian tiled step looked tired and had been damaged by long term settlement in the sub floor. They ideally wanted to keep the original tiling but thought it would have to be replaced. The problem was that one section of the base had dropped and the tiling had cracked either side of this.

Victorian Tiled step Before Repair and Restoration Chislehurst

After visiting the property, I told the client that it could be repaired with matching reproduction tiles and fully restored. My client was happy with this suggestion, and they agreed to go ahead with my quote on that basis.

Victorian Tiled step Before Repair and Restoration Chislehurst

Repairing a Victorian Tiled Path and Step

Our workload has been busy this year so I returned as soon as I could and started by carefully lifting the tiles from the dropped section and all the cracked tiles that had been affected. Before retiling I had to underpin the original base and raise the level with new concrete. Once this was done, I left the property for a few days so the new concrete base could cure fully.

When I returned to the job, I set about fixing the replacement reproduction tiles in place laying them down in the same pattern as before, again these needed time for the adhesive to set so I left the property once completed.

Victorian Tiled step During Repair and Restoration Chislehurst

Restorative Cleaning of Victorian Tiles

I returned again a few days later to clean and seal the tiles. I first used Tile Doctor Remove and Go to remove any ground in dirt and old sealers that may be on the original tiles. As these tiles were outside and open to the elements, I needed to remove some blackening from the tiles and used Tile Doctor Patio and Brick Driveway Cleaner to get that off. I put this on the tiles and let it dwell for a while, adding water to it to keep the tiles wet. It was a small area so to help lift the dirt out of the tile I scrubbed the tiles by hand. Once done the whole area was rinsed with more water and the soil extracted with a wet vacuum.

The next step was to bring up the appearance of the tiles and remove further dirt with the application of a 100 and then 200-grit milling pad. These pads are applied with water for lubrication and do a great job of deep cleaning the tiles and hone up the face of the tile to ease the sealing process. It was a small area, and the weather was good so it wasn’t too long before I could move onto sealing.

Sealing a Victorian Tiled Path and Step

When the tiles were dry, I applied two coats of Tile Doctor Colour Grow and then once this had dried, I applied a coat of Tile Doctor Stone oil. Both these sealers are impregnators, which soak into the pores of the tile to enhance the appearance and natural colours of the tiles.

Victorian Tiled step After Repair and Restoration Chislehurst

It took a half few days to fully restore the path, fortunately Chislehurst is very close to my base in Bromley and so I was able to do some other work in between. The step looked new afterwards and my client was very impressed with the completed job.


Professional Restoration of a Victorian Tiled Step in South East London

Damaged Victorian Tiled Step Fully Restored in Chislehurst Read More »

Rebuilt Victorian Tiled Hallway Cleaned and Sealed in Bromley

Rebuilt Victorian Tiled Hallway Cleaned and Sealed in Bromley

Not too long ago I was called to the large town of Bromley, where my client was in the process of renovating an Edwardian house. The house has a fascinating original geometric Victorian tiled hallway which had previously been covered in carpet which my client now wanted restoring and extending.

Before beginning my work I had an initial consultation with the client and liaised with the builder. It was agreed that the existing floor joints would be strengthened and the current floorboards would be replaced with ply sheets, allowing for the area to be fitted with new Victorian tiles, ensuring that these were consistent with the original design.

Geometric Victorian Floor Restoration Bromley Before

Restoring a Victorian tiled hallway

The first task was to clean the original tiles so that they would blend in with the fresh, new tiles. To do this I mixed a solution of three parts Tile Doctor Pro-Clean (a high alkaline cleaner) to one part clean water, combined with a small quantity of NanoTech HBU. NanoTech HBU is a penetrating cleaner which uses nano-sized particles to reach areas other cleaners simply can’t in order to lift out difficult stains and ingrained dirt.

This solution was washed over the floor, and was left to dwell for five minutes. I then used my rotary machine with a black pad to agitate and work the solution into the dirty tiles. After completing this initial clean I used a wet-vac machine to hoover up the resulting residue.

There was also some glue residue around the edges of the floor from where carpet grippers had been placed years before. To remove this I used Tile Doctor Remove & Go, which breaks down adhesives, waxes and old sealers. I covered the treated area with plastic to prevent it from drying out, before leaving it to sit for a couple of hours. Once the product had begun to break down the glue I then agitated it with a scrubbing pad to remove the residue. The area was then cleaned with the Pro-Clean/NanoTech HBU solution.

Tiling with Victorian floor tiles

Once the old floor was clean I started laying down the new floor using a matching set of tiles I had managed to source. Victorian tile designs are still very popular so many of the original designs can still be found being made today.

Geometric Victorian Floor Restoration Bromley During Tiling Geometric Victorian Floor Restoration Bromley During Tiling

Once the tiles had been stuck to the new hardboard I was able to give both floors a general clean with a weak dilution of Tile Doctor Pro-Clean to remove any dirt from tiling etc, this was followed by a rinse and the use of a wet vacuum to get the floor as dry as possible before sealing.

Geometric Victorian Floor Restoration Bromley During Tiling

Sealing a Victorian tiled hallway

After leaving the house for more than 24 hours to allow the hallway to dry completely, I returned to seal the tiles. After inspecting the area to ensure no excess moisture remained, I applied five coats of Tile Doctor Seal & Go, a water-based topical sealer, to both the old and new tiles.

This gave the entire hallway a nice sheen finish (as you can see from the photographs), as well as a robust surface seal to protect the tiles from dirt and wear in the future.

Geometric Victorian Floor Restoration Bromley Tiling Complete
Once the sealing process had been completed, it was near impossible to distinguish between the old and new tiles and as you can imagine the customer was very pleased with the end result.

Geometric Victorian Floor Restoration Bromley Sealed
 

Victorian tiled Hallway restored, rebuilt and extended in Kent

Rebuilt Victorian Tiled Hallway Cleaned and Sealed in Bromley Read More »

=================================

South East London Tile Doctor

================================= Read More »

Scroll to Top